
OV25 Setup for Shopify and WooCommerce
Configure how the OV25 configurator appears and behaves on ecommerce storefronts.
The OV25 setup UI is a visual editor for the configurator experience on your storefront. Use it to choose where the configurator appears on the product page, how customers open it, how options are presented, and how the UI should look next to your theme.
It is the same editor on both platforms. On Shopify it is the Configurator tab of the OV25 app; on WooCommerce it is the OV25 setup screen in WP Admin. Only the store-wide fields near the end of this page differ between the two.
Product type
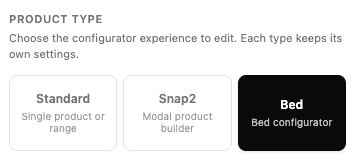
The Product Type selector at the top of the Settings tab chooses which kind of configurator you are editing. Each type keeps its own completely separate settings, so switching type does not change what you just configured for another one.
| Type | What it is |
|---|---|
| Standard | A single product or range. The common case. |
| Snap2 | A modular product builder, where the customer assembles modules into a whole. |
| Bed | A bed configurator, with separate headboard, base and mattress sections. |
Pick the type matching the products you are setting up. Some controls described below only appear for one type, and each is marked where that is the case.
How the editor is laid out
On the left is a preview of what the configurator will look like. On the right is a panel where you can change the settings.
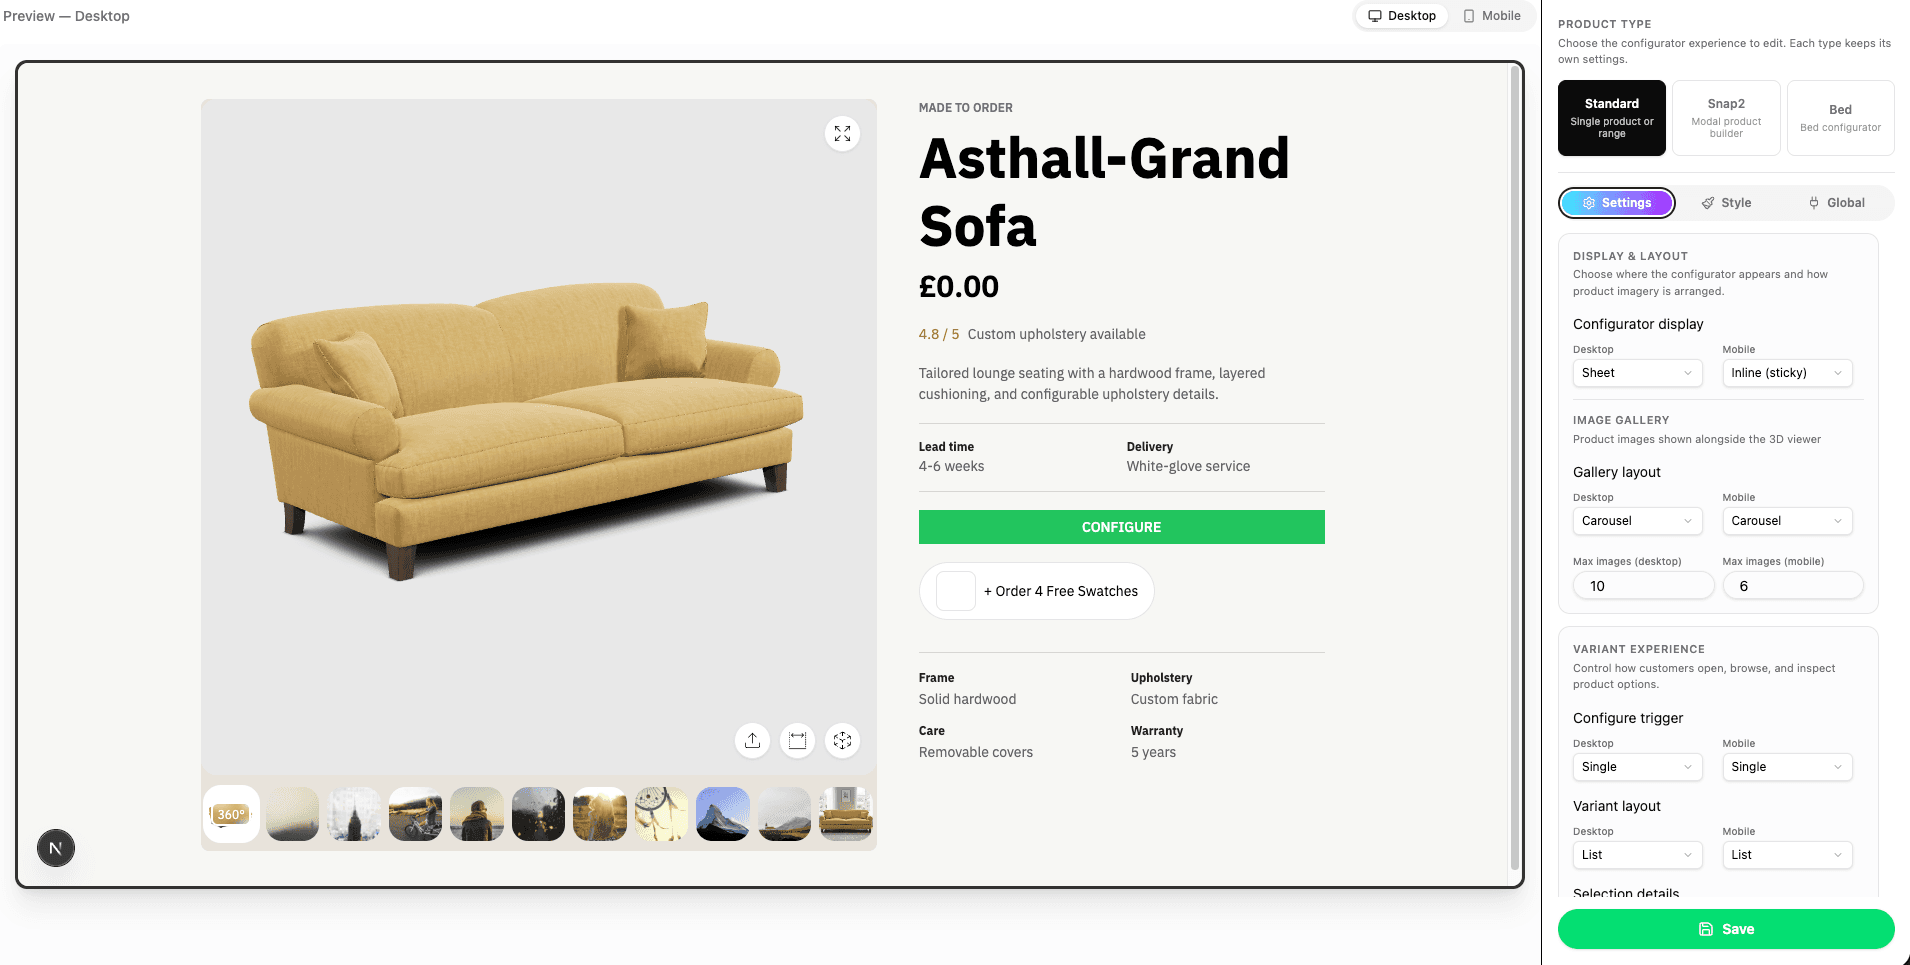
The panel has three tabs:
| Tab | What it holds |
|---|---|
| Settings | Where the configurator sits and how it behaves: display & layout, variant experience, storefront selectors, behaviour. |
| Style | How it looks: element styles, your logo, custom CSS, and text overrides. |
| Global | Store-wide fields belonging to Shopify or WooCommerce rather than to the configurator. |
What your settings apply to
Settings can be saved as defaults for every OV25 product in the store, or for a single product that needs something different. A per-product setting always wins over the default.
The control that chooses this sits above the preview, and works slightly differently per platform - see Shopify or WordPress (WooCommerce).
Set your defaults up first and only override individual products where you have to. Anything you leave on the default keeps following it, so a later change to the default reaches those products automatically.
Desktop and mobile
Most layout controls are set twice, once for desktop and once for mobile, shown as a Desktop and a Mobile column. The two are independent: a configurator can be inline on desktop and open in a drawer on mobile.
The available choices are not always the same on both. Where they differ, the tables below list each separately.
Settings tab
This tab controls layout & behaviour of the configurator.
Display & layout
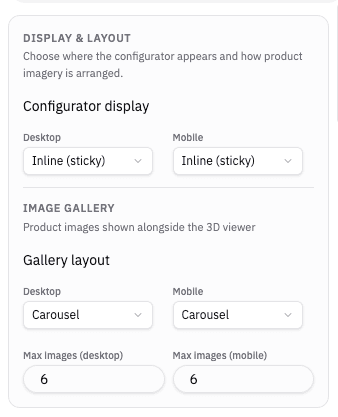
Configurator display
This is the main setting controlling the layout of the configurator. Options depend on the product type.
Standard and Bed:
| Option | Desktop | Mobile | What it does |
|---|---|---|---|
| Inline | ✓ | ✓ | Configurator is embedded on the page. |
| Inline (sticky) | ✓ | ✓ | Inline, but the viewer stays visible while the variants scroll. |
| Sheet | ✓ | - | Configurator opens fullscreen with variants in a sheet on the right. |
| Drawer | - | ✓ | Configurator opens fullscreen with variants in a sheet at the bottom. |
| Modal | ✓ | ✓ | Centred overlay dialog. |
| Variants sheet | ✓ | ✓ | A sheet containing only the variant controls, leaving your own gallery in place. |
Snap2:
| Option | Desktop | Mobile | What it does |
|---|---|---|---|
| Dialog | ✓ | ✓ | Centred overlay dialog. |
| Drawer | - | ✓ | Configurator opens fullscreen with variants in a sheet at the bottom. |
| Inline | ✓ | ✓ | Configurator is embedded in the page. |
Inline (sticky)
Inline (sticky) is available for Standard and Bed configurators. It keeps the 3D viewer visible while the customer scrolls through a long inline variant list. This mode is similar to a standard e-commerce PDP.
- On desktop, use a two-column product layout with the gallery/viewer in one column and the variant controls in the other.
- On mobile, use a single-column layout with the gallery/viewer before the variant controls.
- The viewer automatically accounts for a detected fixed or sticky site header. If detection picks the wrong element, set a Header selector on the Global tab.
- A mobile sticky layout does not leave enough space for the product carousel below the viewer. Give the carousel a Mobile carousel target so it can be placed elsewhere on the product page.
The integration repairs common layout wrappers and can fall back to a body-level sticky layer when the storefront theme prevents native sticky positioning. The product-page structure still needs to follow the desktop or mobile layout described above.
Snap2 panel positions
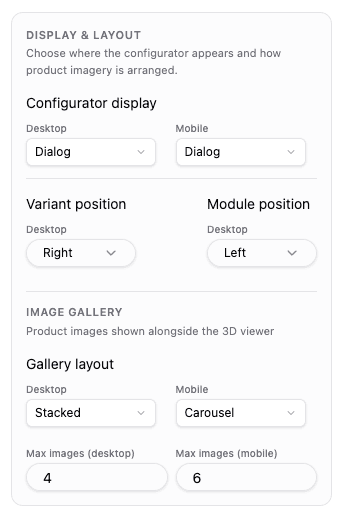
When Snap2 is set to Dialog on desktop, two extra controls appear:
| Setting | What it controls |
|---|---|
| Variant position | Whether the main Snap2 variant panel opens on the Left or Right. |
| Module position | The module selection panel is on the Left, Right, or at the Bottom. When it matches the variant position, modules are shown in the same side panel. |
Module position is a desktop-only setting. Both controls are hidden for desktop Inline and for every mobile Snap2 layout.
Image gallery
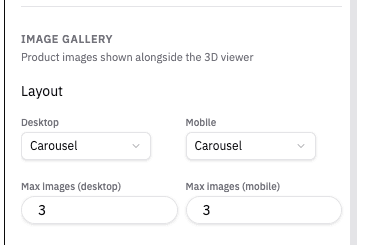
Controls how your existing product images sit alongside the 3D viewer. The gallery shows image from both the Shopify product and OV25 product.
| Setting | What it does |
|---|---|
| Gallery layout | None for no product images, Carousel for a horizontal scroller, or Stacked for a vertical grid. Set separately for desktop and mobile. |
| Max images (desktop) | How many of your product images to show on desktop. Minimum 1. |
| Max images (mobile) | The same limit for mobile, set independently. |
Variant experience
How customers open, browse and inspect the product's options.
Configure trigger
Controls how many buttons the customer sees to open the configurator.
| Option | What it does |
|---|---|
| Single | One configure button. |
| Split | Separate add and configure actions, for example one button for Fabrics and one for Legs. |
Variant layout
Chooses how the product's options are presented to the customer. Set separately for desktop and mobile.
| Option | What it does |
|---|---|
| Tree | Nested groups. |
| List | A flat list. |
| Tabs | Tabbed groups. |
| Accordion | Collapsible groups. |
| Wizard | Step by step, one option at a time. |
| Guided overview | A review hub the customer returns to, with focused editors for each option. |
Selection details
Chooses what happens when a customer wants a closer look at a selection, such as a fabric swatch, before committing to it.
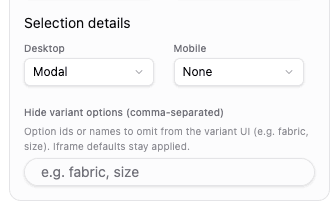
| Option | Desktop | Mobile | What it does |
|---|---|---|---|
| None | ✓ | ✓ | No detail view. Clicking selects the option directly. |
| Tooltip | ✓ | - | A preview on hover or keyboard focus. |
| Sheet | ✓ | - | Slides in from the right. |
| Modal | ✓ | ✓ | Near-fullscreen dialog. |
| Fullscreen | ✓ | ✓ | Fills the viewport. On mobile it slides in. |
Starting configuration
Snap2 only. When on, the preview loads a fixed demo configuration, so you can see how the builder looks with modules already placed instead of as an empty canvas.
This changes the preview in this editor only. It has no effect on your storefront, and the demo configuration it loads is not configurable.
Hide variant options
A comma-separated list of option ids or names to omit from the customer-facing variant UI, for example fabric, size. Defaults coming from the configurator itself still apply.
Bed sections
Bed only. Two groups of switches, one per bed section - Headboard, Base and Mattress.
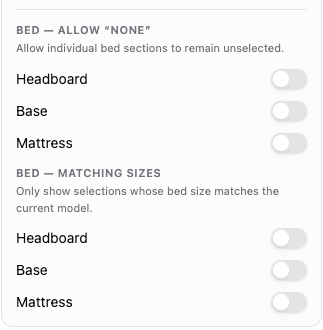
| Group | What it does |
|---|---|
| Bed — allow "None" | Allows that bed section to be left unselected, so a customer can buy a bed without a mattress. |
| Bed — matching sizes | Shows only the selections whose bed size matches the current model, hiding options that would not fit. |
Storefront selectors
An "element" is one piece of the OV25 experience that gets placed into your product page: the viewer, the price, the option controls, and so on.
Each element has a toggle to turn it on, and a CSS selector telling OV25 where on your product page it belongs. The selector points at an element already in your theme, and OV25 either replaces it or renders inside it.
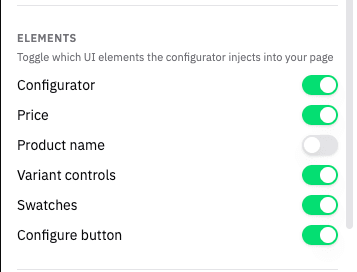
| Element | What it controls |
|---|---|
| Configurator container | The 3D viewer and image gallery. |
| Price | The configured product price from OV25. |
| Product name | The product or range name from OV25. |
| Variant controls | The controls for configuring the product, for choosing size, colour, fabric, legs, etc. |
| Swatches | The widget that opens the swatch book. |
| Configure button | The button that opens the configurator. Only relevant in some display modes. |
Selectors are saved per product type, so the same element can sit in a different place for a Standard and a Bed product.
This section does not appear when Snap2 is the selected product type. Snap2 places its own UI and has no selector controls.
To find a selector, open your product page, right-click the element you want and choose Inspect. On Shopify, you can skip this for the variant controls and the carousel by adding the OV25 theme blocks instead, which give OV25 a known place to render into.
Behaviour
Fine-tune loading, commerce controls, visibility, and responsive overrides.
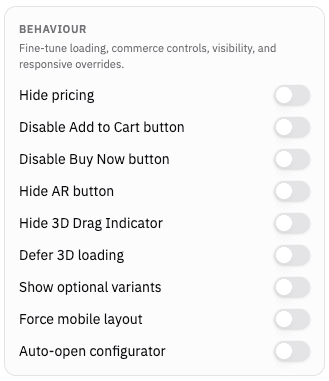
| Setting | What it does |
|---|---|
| Hide pricing | Hides OV25 pricing everywhere in the configurator UI. |
| Disable Add to Cart button | Prevents OV25 from showing or using its add-to-cart action. |
| Disable Buy Now button | Hides the direct Buy Now action, leaving Add to Cart available. |
| Hide AR button | Hides augmented reality controls. |
| Hide 3D Drag Indicator | Hides the animated hand hint. Does not disable the default startup rotation. Turning this off does not enable the hand hint. |
| Defer 3D loading | Shows product imagery first and and loads 3D configurator in the background. Makes page-load appear faster. |
| Show optional variants | Shows optional selections where supported. |
| Force mobile layout | Always uses the mobile configurator layout. Mainly for testing or special embedded layouts. |
| Auto-open configurator | Opens the configurator as soon as the page loads. Has no effect on inline display modes. |
The product viewer uses a small left/right rotation on first load by default. To restore the hand hint, leave Hide 3D Drag Indicator off and add gestureHint=true to your integration's productLink. This also disables the automatic rotation. To disable the rotation without enabling the hand hint, add hideJiggle=true instead. These URL options are configured in your integration; see Choose the startup hint for examples.
Style tab
Everything about how the configurator looks. The sections below appear in this order in the panel.
Brand identity
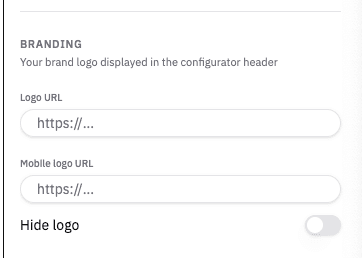
| Setting | What it does |
|---|---|
| Logo URL | Use your custom logo in the configurator. |
| Mobile logo URL | Uses a different logo on mobile. |
| Hide logo | Hides the logo from the configurator UI entirely. |
Style groups
The bulk of the tab. Six collapsible groups of visual variables let you match the configurator to your brand without writing any CSS - colours, fonts, spacing, borders and corner radius.
| Group | What it covers |
|---|---|
| Gallery & Viewer | 3D viewer, carousel images, spacing, and overlay controls. |
| Product Variants & Collections | Variant thumbnails, collection buttons, highlight styles, and panel sizing. |
| Action Button | Add to basket, checkout, and configure buttons. |
| Colors & Theme | Background, text, border, and accent colours. |
| Typography | Font family, sizes, and product title/price colours. |
| Rounding & Layout | Global corner radius scale, panel sizing, and popup styles. |
Element styles
Target specific elements with custom CSS properties. Pick a known OV25 element, such as the checkout button, and apply common CSS properties to it, without needing to write a selector yourself.
See the Element Selector Reference for the full list of elements you can target, grouped by area and searchable by common alternative names.
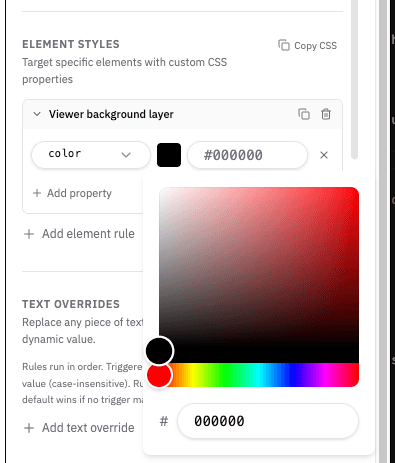
The element list includes stable selectors for commonly customised UI parts, including:
- size variant card grids, names, dimension rows, lines, markers, and values;
- Snap2 module names, module-name tooltips, and module detail titles;
- selected and unselected states through
[data-selected="true"]and[data-selected="false"]; - product carousel items, variant cards, option tabs, and module controls that expose
data-selected.
Text overrides
Replace any piece of text in the configurator with a custom, dynamic value. Use this for brand tone, regional spelling, or clearer storefront labels.
See the Text Override Reference for the full list of strings you can replace, each with its key and default wording.
Examples:
- change "Configure" to "Customise"
- rename option headings such as "Fabric" to "Choose your fabric"
- rename a fabric from "Cotton" to "Cotton Blouse"
Some text overrides can use conditions. The image below shows the option "Fabric" renamed to "Seat Material", with all other options unaffected.
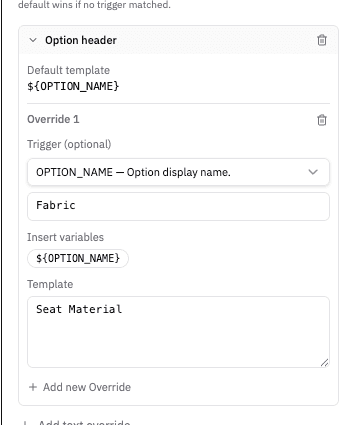
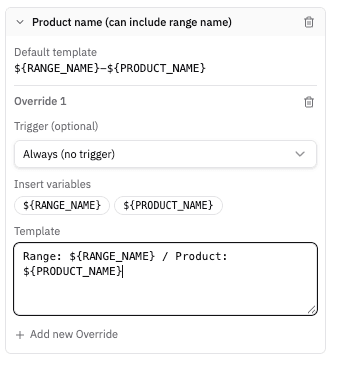
Some text overrides can also include dynamic values, such as product name, option name, selected variant name, or price. Where these are available they are shown as clickable buttons.
Below is an example of changing the product name from "Windrush Loveseat" to "Range: Windrush / Product: Loveseat".
Custom CSS
Raw CSS that overrides everything above, for rules the style groups and element styles cannot express. You can target any of the selectors listed above.
Global tab
These fields describe your storefront rather than the configurator, so they apply to the whole store and are not set per product.
| Setting | What it does |
|---|---|
| Header selector | The storefront header used by sticky layouts. Only needed when automatic detection picks the wrong element. |
| Desktop carousel target | Where the OV25 image carousel is moved on desktop. Must match exactly one element. |
| Mobile carousel target | Where the OV25 image carousel is moved on mobile. Needed for mobile Inline (sticky). |
| Add-to-cart form selector | The product form OV25 submits after a configuration is added, for example form[action^="/cart/add"]. |
| Currency symbol | Overrides the symbol shown for prices. |
These are editable while you are editing the store defaults, and read-only once you select a single product.
Saving
Click Save to apply your settings to the storefront. There is no separate publish step - saved settings are live immediately.