Shopify
Use our Shopify App to integrate features directly in your store's admin.
1. Install the Orbital Vision Shopify App
Orbital Vision will provide you with a private installation link for the OV25 Shopify App. To get started:
- Click the installation link provided by Orbital Vision (If you havent been provided one already, please contact info@orbital.vision and request an app url)
- Log into your Shopify admin account if prompted (must be store owner)
- Review and accept the app installation permissions
Your live store will not be affected until you configure the app settings and link your products.
2. Activating the plugin in your theme
After installing the app, you need to activate the Orbital Vision app block in your theme so the app's javascript and stylesheets are loaded on the storefront.
- In Shopify Admin, go to Online Store → Themes
- Click Edit Theme
- In the side menu, select App Embeds
- Click the toggle for OV25 Configurator to turn it on
- Save the changes

3. Configure Shopify Admin Settings
The Orbital Vision Shopify App allows you to integrate 3D product configurators into your Shopify store. To get started, you'll need to configure a few settings in your Shopify Admin. In the Shopify Admin, select the Orbital Vision App and navigate to the settings page.
Store Domain Configuration
Enter your Shopify store domain in the format:
or
Important: Do not include https:// or any protocol. Only enter the domain name.
API Key Configuration
You need to obtain and configure an API key with the productConfiguratorAccess type.
You can create a new API key in your dashboard at app.orbital.vision/auth/api-keys. Please select the Product Configurator Access type from the dropdown list.
HTML Query Selectors
You need to configure query selectors for various page elements to properly integrate the configurator with your Shopify theme. Enter the appropriate CSS selectors for the following elements:
Gallery Selector
Where you want the configurator iframe to appear (usually replaces product images)
Variant Controls Selector
If you have existing controls that you want to replace, you can specify the classname in the ov25 admin panel. Otherwise (recommended), follow these steps:
- Open the Shopify theme editor
- Go into theme customization and add the ov25-controls block into the page where you want the variant controls to appear
- Save the theme
Price Selector
Where the product price is displayed
Name Selector
Where the product name is displayed
Tip: You can find these selectors by inspecting the HTML of your Shopify product page. Use developer tools (right-click and select "Inspect" in most browsers).
Additional Settings
Logo URL
The image that appears on the configurator UI when it is fullscreen.
Auto Carousel
Turn on to automatically insert carousel underneath the 3D viewer/image gallery. This creates a slideshow of product images that users can browse alongside the 3D configurator.
Defer 3D
Turn on to use your product images first, and only switch to 3D when the user makes a variant selection. This improves initial page load time and provides a smoother user experience by loading the 3D scene in the background.
Configurator Setup UI
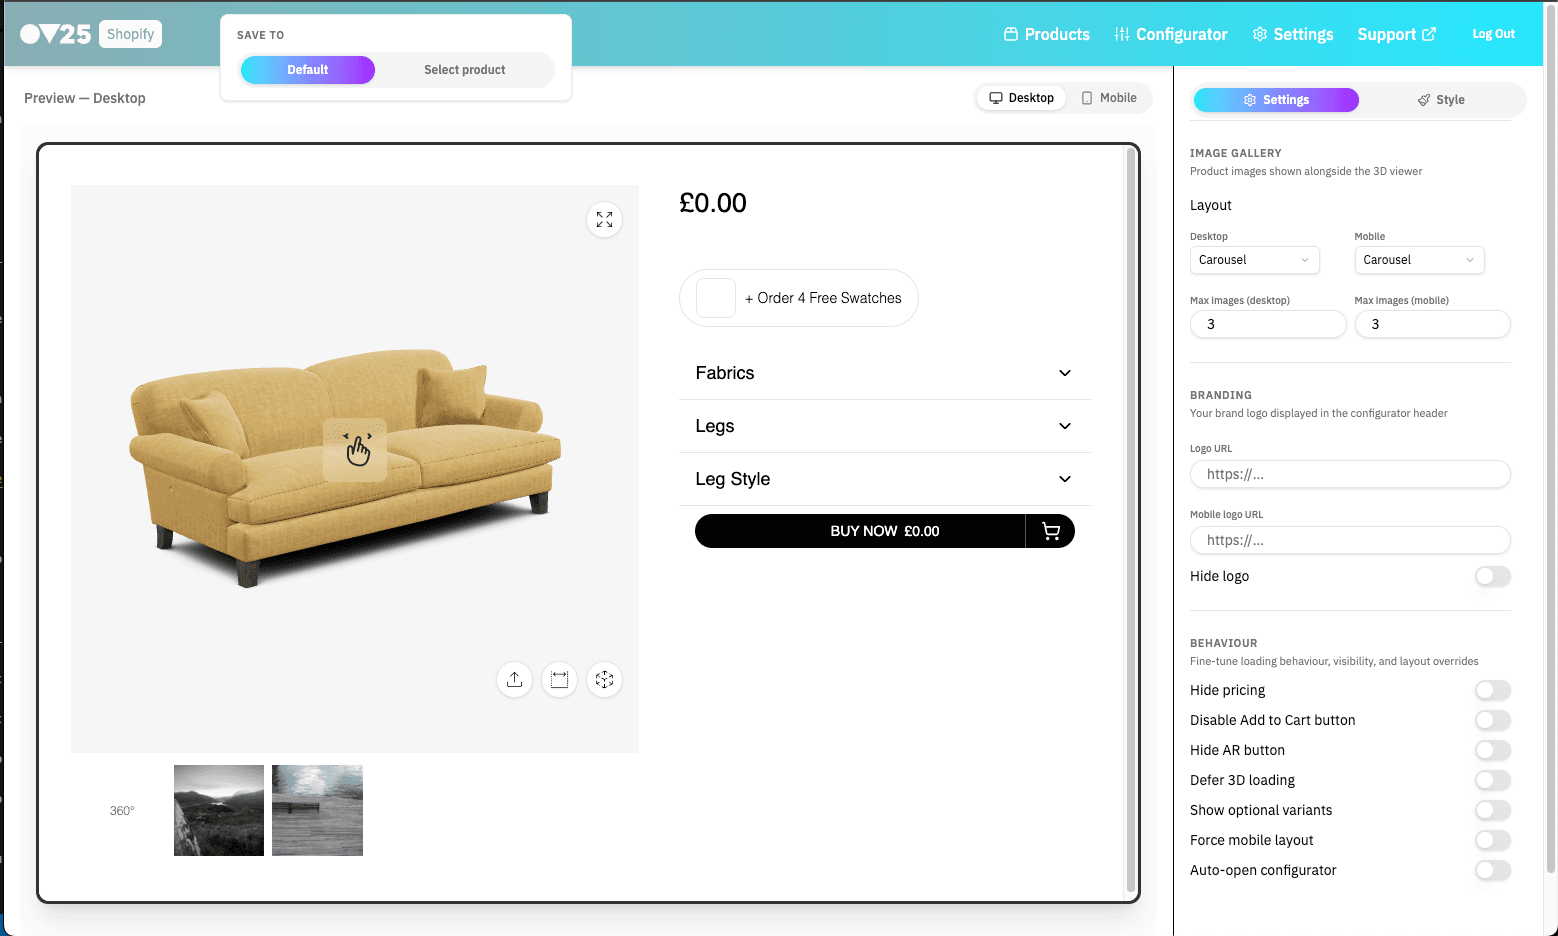
Open the Orbital Vision Shopify App in Shopify Admin, then go to the Configurator tab. This opens the OV25 setup UI for your Shopify storefront.
Use this tab to control storefront layout, element selectors, gallery behaviour, branding, element styles, text overrides, and behaviour flags. In Shopify, these settings are saved by the app and passed to the storefront automatically.
See OV25 Setup for Shopify and WooCommerce for an explanation of what each setup control does.
4. Linking Products
After configuring the settings, you need to link your Orbital Vision products to your Shopify products.
OV25 Products can be linked to Shopify products in 3 ways:
-
Via the OV25 Dashboard by selecting a product then scrolling down to the "Shopify" section and selecting a Shopify product.
-
Using the OV25 widget on the Shopify admin product page. Select a product, scroll down to the "Blocks" section and add the "OV25 Configurator" block. From here you can select an OV25 product to link.
-
Via the OV25 plugin in the "Products" tab. Select an OV25 product, then select the corresponding Shopify product you want linked.
Once linked, the product configurator will be active on your Shopify product page. Check the pricing and product are as expected.
Each Shopify product can only be linked to one Orbital Vision product at a time.
5. Swatches Page Setup
The OV25 swatches page displays fabric samples from your entire range of products. Customers can make their selections and order a sample pack.
Setup Instructions
- Make sure you have setup and enabled swatches for your products in the OV25 dashboard. Visit the Dashboard Documentation for more information.
- Visit https://app.orbital.vision/auth/api-keys and generate a privateApiKey.
- Input this the "Private API Key" field on settings page of the Orbital Vision Shopify App in your Shopify admin.
The Swatches page is supplied as a Shopify app block, which can be added to any page template. Below are instructions for basic setup, but you may want a different approach.
- In the Shopify Theme Editor, create a new template. Click "Add Section" and add the "OV25 Swatches Page" app block to the template ("OV25 Swatches" is the widget for a product page).
- Create a new page and assign it the new template.
- Preview the page and consider styling it to match your site's theme.
- Add a link to the swatches page in your site navigation, footer, or wherever it makes sense for your customers to discover it.
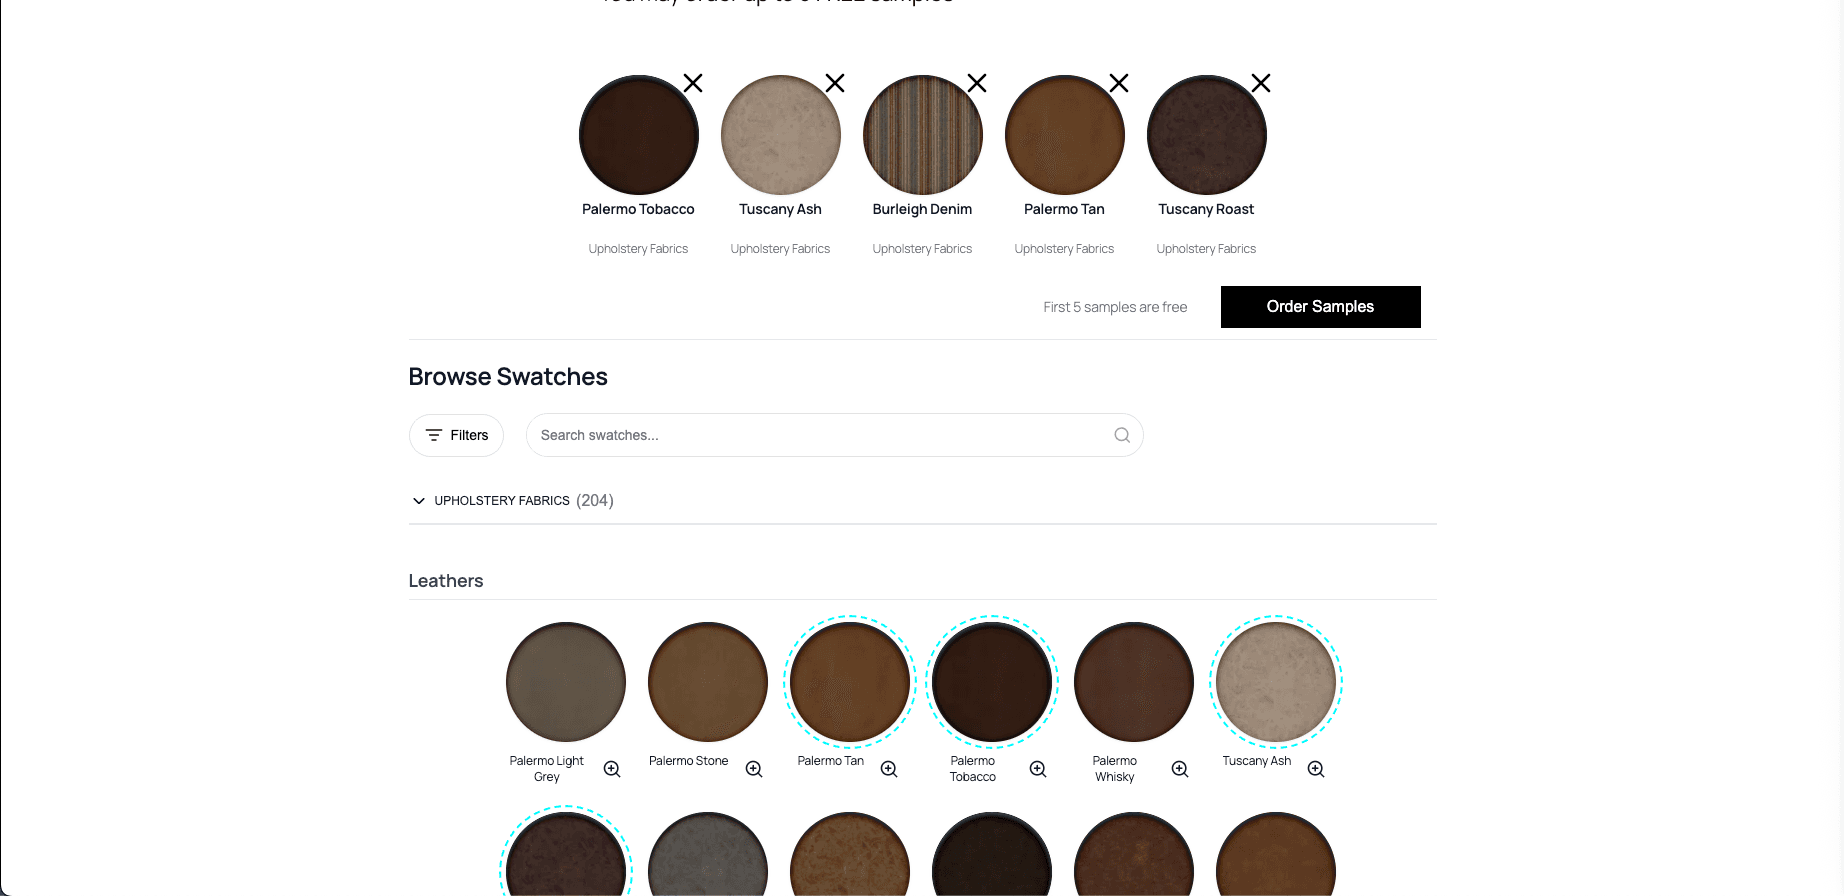
Swatch Page Layout
All swatches are displayed in a grid layout on the left hand side of the page. Swatches are grouped by options, and can be expanded to view a high resolution image of the swatch.
The customer's cart is displayed in a panel on the right hand side of the page. It shows all the swatches in the cart, and the cost breakdown. Clicking the "Order Samples" button will open the checkout page.
Customers can add or remove swatches from their cart by click the + or - buttons next to the swatch.
You can customize the swatch page's appearance using custom CSS.
Swatches on Product Pages
From any page with a 3D configurator on it, customers can add swatches to their cart. Any fabric with a swatch will have a button to add or remove the swatch from their cart. Swatches are shared between all product pages and the swatches page.
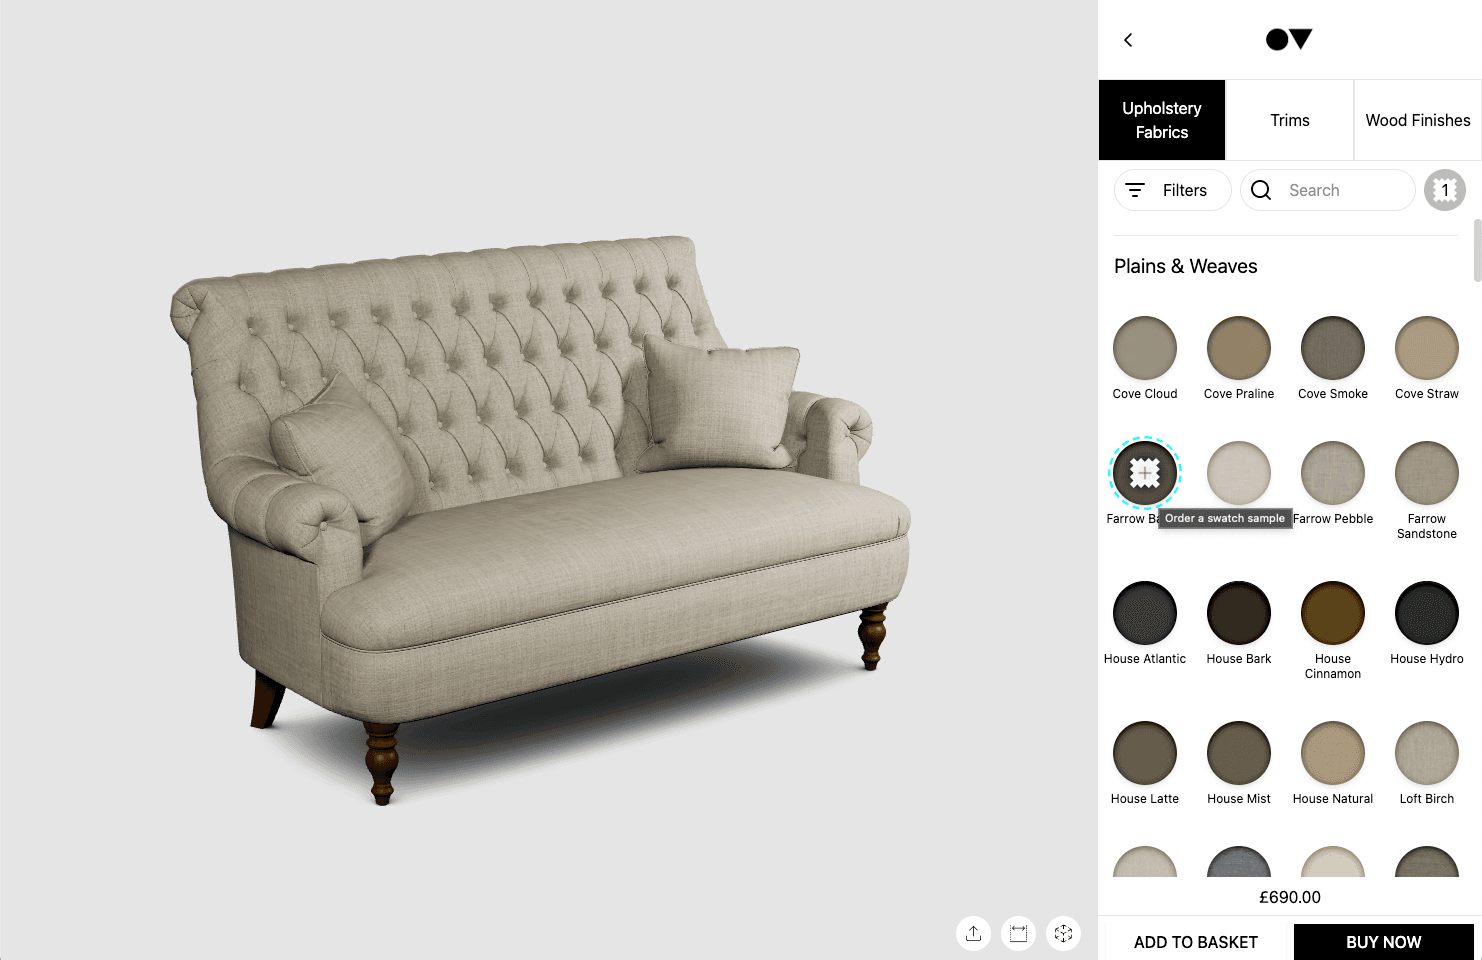
Customers can also see their swatch cart directly on the product page. This can be shown by clicking the swatch icon inside the 3D configurator UI (next to the search bar).
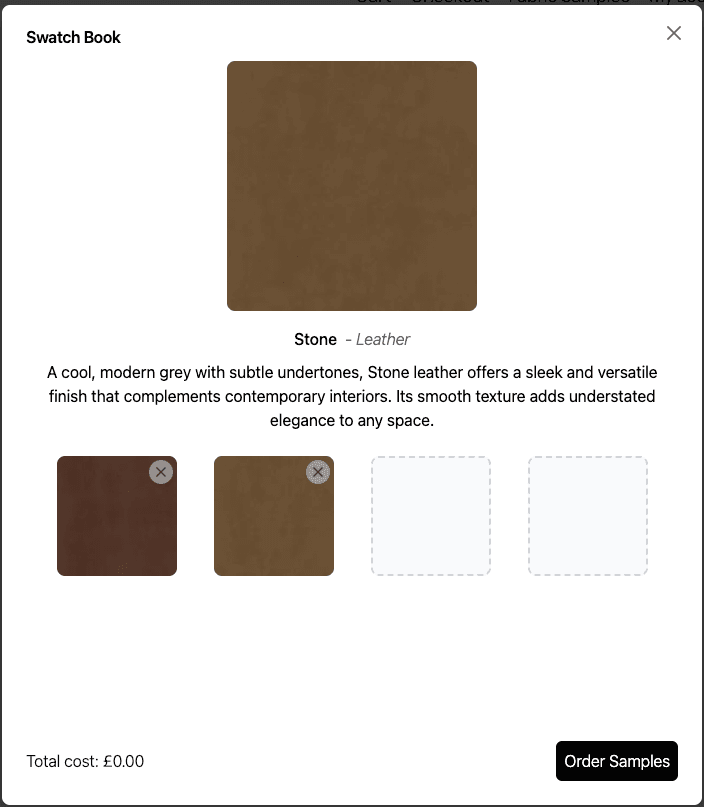
You can also add a button to you product page to directly open the swatch book. This can be done by adding the "Swatches" block to your product page template.
6. Custom App Integration
OV25 integrates with default Shopify themes, but custom Shopify storefronts may require some extra steps for full integration. This may require editing the .liquid files for any custom parts of your storefront that show or use pricing. It may also require some custom CSS styling.
Pricing
OV25 handles pricing of products and variants. These values are stored in an item's properties, and are accessible on Liquid line_item objects properties.
Shopify Line Item Documentation
OV25 provides analogues to four line_item properties.
You should replace these in the .liquid code for any custom parts of your storefront that show or use pricing:
These properties are accessible via this syntax:
But we recommend defining them with a default value for when a product is not linked via OV25:
We also provide a property for the product's base price, without any variants:
And for the product's OV25 SKU:
You can also calculate cart totals by summing prices for all items:
Opening the Configurator or Swatchbook programmatically
If you want more control over how the configurator or swatchbook is opened, you can attach the following functions to your custom buttons:
Attach them to your button's click handler:
You can open the configurator on a specific option by passing the option name to the function:
Custom Cart Thumbnails
OV25 provides custom cart thumbnails for each product. The thumbnail will show the specific fabric and other options selected by the user, so its clearer exactly what product is in the cart.
The URL to the thumbnail is stored as a string in item.properties['_ov25_cart_image_url'] and should be rendered with a fallback to the standard product thumbnail.
7. Variants
OV25 handles all variants. So either remove variants from products linked to OV25,
or edit your .liquid to only show variants if item.properties['_ov25_product_id'] == nil.
8. Custom Checkout Buttons
Instead of using window.location = '/checkout', instead call window.requestOV25Checkout() on the onClick handler for your checkout button.
All checkout buttons must point to the OV25 checkout. If using default checkout, any variant prices will not be shown, or shown as £0.00.
9. Express Checkout
Overview
Express/Accelerated checkout options (like Shop Pay, Apple Pay, or Google Pay) are not compatible with OV25 products due to their dynamic pricing nature. You'll need to conditionally hide these buttons when OV25 products are present in the cart.
Implementation
To properly handle express checkout buttons, follow these steps:
- Check if any items in the cart are OV25 products
- Hide express checkout buttons if OV25 products are found
- Show express checkout buttons only for carts with standard Shopify products
Example Code
Here's how to implement this logic in your Liquid templates:
Make sure to apply this check anywhere express checkout buttons appear in your theme (cart page, mini cart, product pages, etc.).
10. V12 Integration
Overview
If you're using V12 Finance or other financing apps that calculate based on product prices, you'll need to configure them to use OV25's pricing instead of Shopify's default pricing. This ensures accurate finance calculations when products have variant-specific pricing.
Configuring V12
V12 Finance integration requires updating the price element selector in its initialization:
- Locate your V12 initialization code that looks like:
- Update the
priceElementto point to the appropriate OV25 price element:- For product pages: use
.ov25-configurator-price - For cart pages: use
.cart-total-value
- For product pages: use
Example Configuration
If you're already displaying OV25 prices correctly in your custom Liquid templates (as described in Section 3), you may not need to make additional changes to your V12 configuration.
11. Custom CSS
Some custom CSS on your page may interfere with the styling of the OV25 UI. You may also want to style the OV25 UI to match the rest of the theme. We have added IDs and classnames to many parts of the OV25 UI. You can use these to style the OV25 UI.